Installation
Thank you for purchasing our theme
After you download our theme from Themeforest you will have main.zip and when you extract you will see:
- 1. Documentation
- 2. Licensing
- 3. wesper.zip
- 3. child-theme
Theme Requirements
To use this theme you must be running at least WordPress 4.7, PHP 5.6.20 or higher.
We recommend that you contact your web hosting service provider to make sure that your server PHP configuration limits are as follows:
-
max_execution_time 600 -
memory_limit 512MB -
post_max_size 32M -
upload_max_filesize 64M
If you are running dedicated server or VPS, you should check your php.ini file. Alternatively, you can edit .htaccess file in the root of your website and add the following values:
-
php_value max_execution_time 600 -
php_value memory_limit 512MB -
php_value post_max_size 32M -
php_value upload_max_filesize 64M
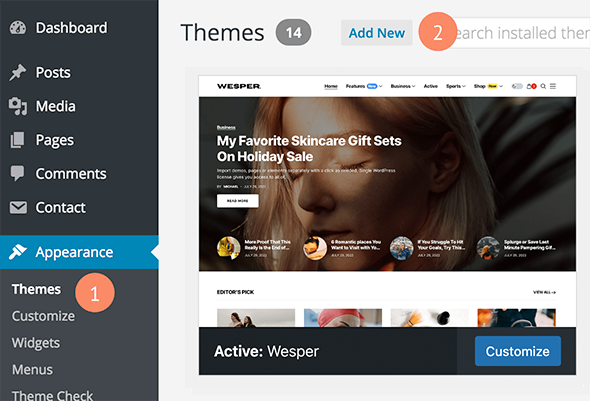
Theme Installation
- Login to your WordPress
- Click on Appearance → themes → "add new"
+ In the "Add new" page, click “Upload Theme”
+ In the "Upload" page, click “Browse” to browse for the theme installation file in donwloaded packagewesper.zip. Click "Install Now".
+ After installing successfully, click "Activate" to make the Apply active
FTP Installation
- Use your FTP software to browse to wp-content/themes folder
- Upload the wesper folder
- Once it's uploaded, go to Appearance → Themes
- Click on Activate
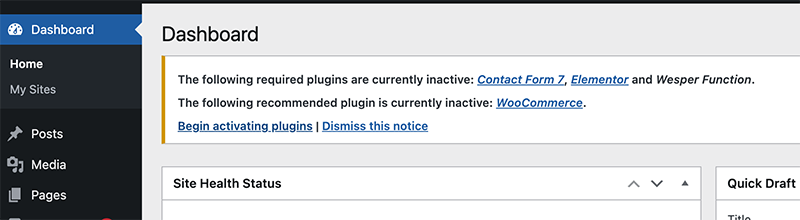
Activate plugin
After installing our theme you need to activate this plugin to make the theme work with full features.
- 1. Wesper Function
- 2. Elementor
- 3. WooCommerce
- 4. Contact Form 7
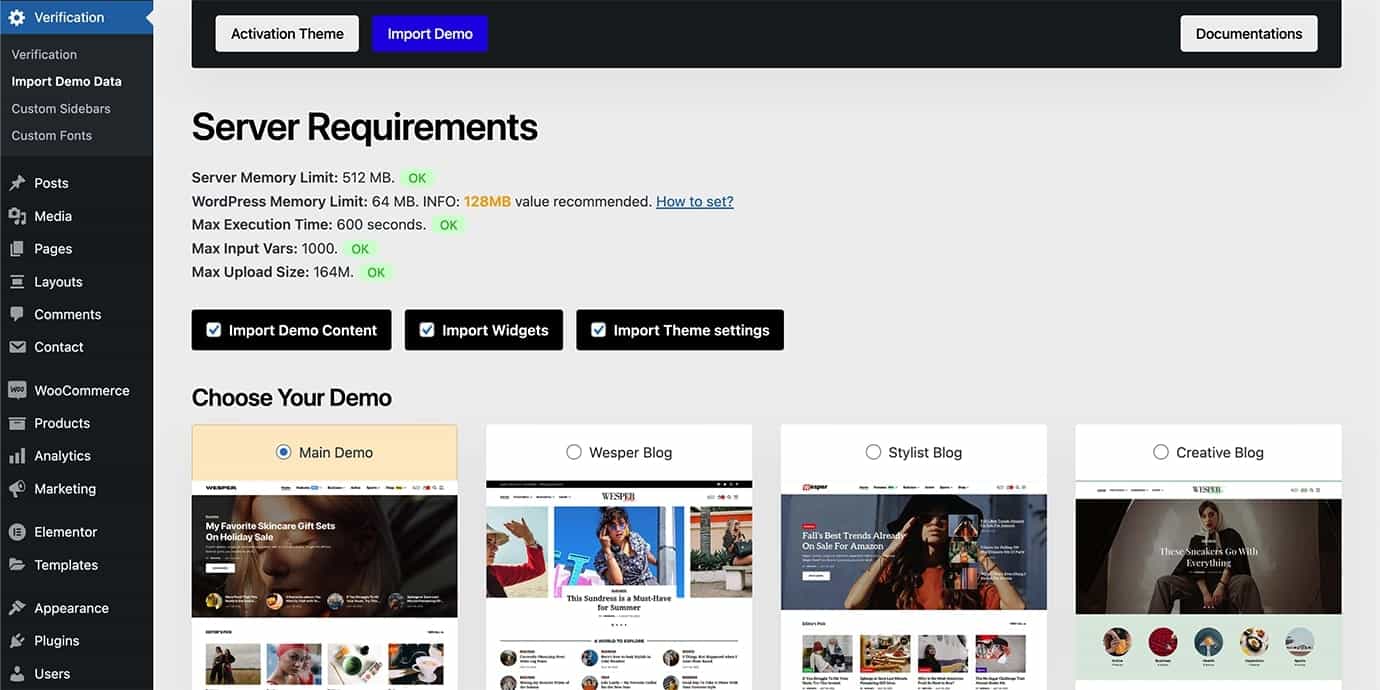
Import Demo Content
In this part, you can choose options, demo layout to import demo content.
- Login to your WordPress
- Click on Verification → import demo data
- Choose options and import demo
Setup Logo
In this part, you can setup logo (normal logo, dark mode logo and other options)
- Click on Appearance → and click on (Customize)
- Click on
theme options→Logofor upload image - And Choose image for your logo
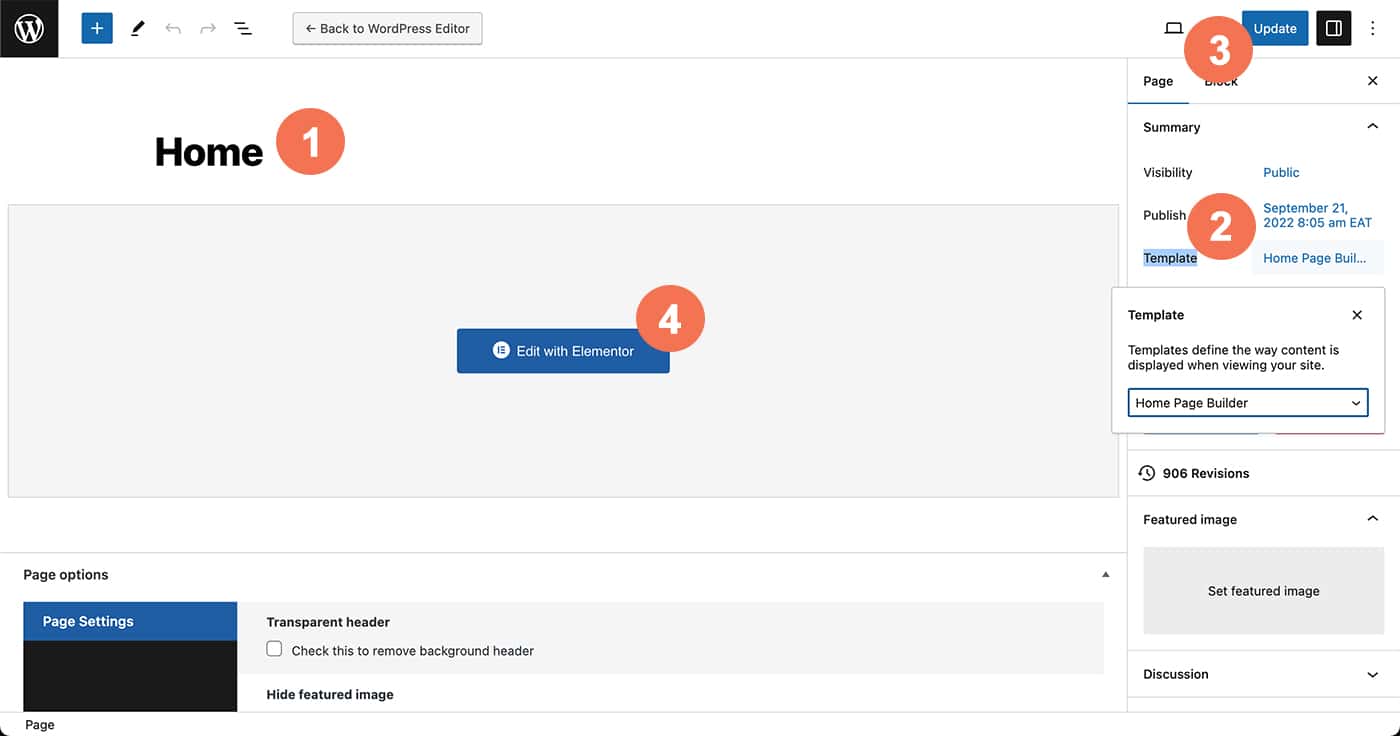
Setup home page
In this part, you can create page for using with Elementor page builder
- Click on page →
add new or edit pageand add title - choose template on the righ
Home Page Builder - click on
Publish or Updatenow you have home page template - for custom home page please click on
edit with Elementor
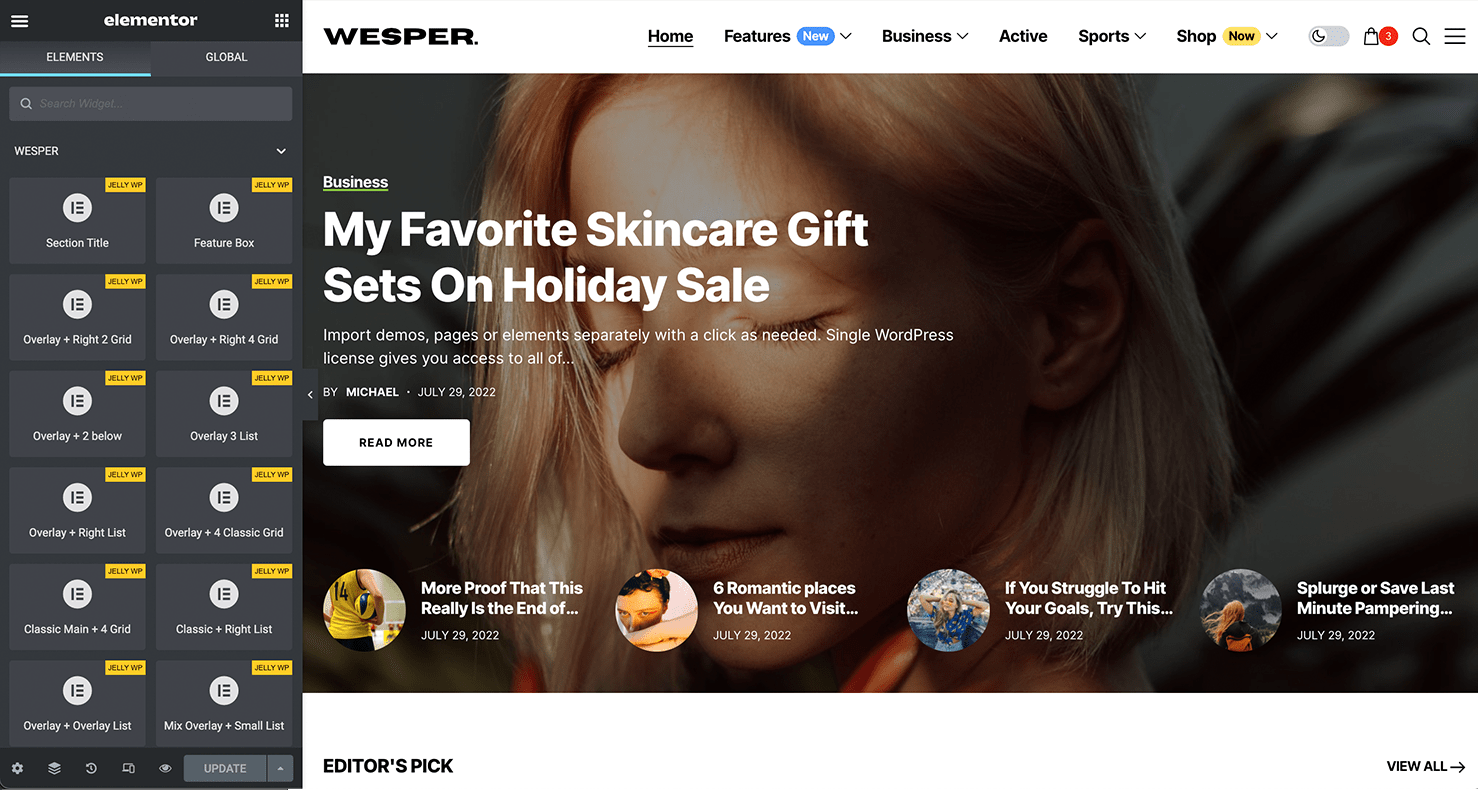
Using page builder
In this part, you can design page, home page, section on your website by using Elementor page builder
After you click on edit with Elementor it will bring you to Elementor builder.
For make blog layout follow this step:
- On the left side you will see
wesperelement - Drag element on left side to area on right side for use it
-
After you drop element on the right side area you will see query options on the left side:
- Post type
- Select categories
- Tag slug
- Author Filter
- Post per page
- Post offset
- Post format
- Exclude Post IDs
- Post IDs Filter
- Sort Order
and more..... - When you finish setting up home you can
Updateto publish your page
How To Use Elementor Tutorial
In this part, you will learn how to use Elementor. Getting started with Elementor is easy, just follow this short overview tutorial.
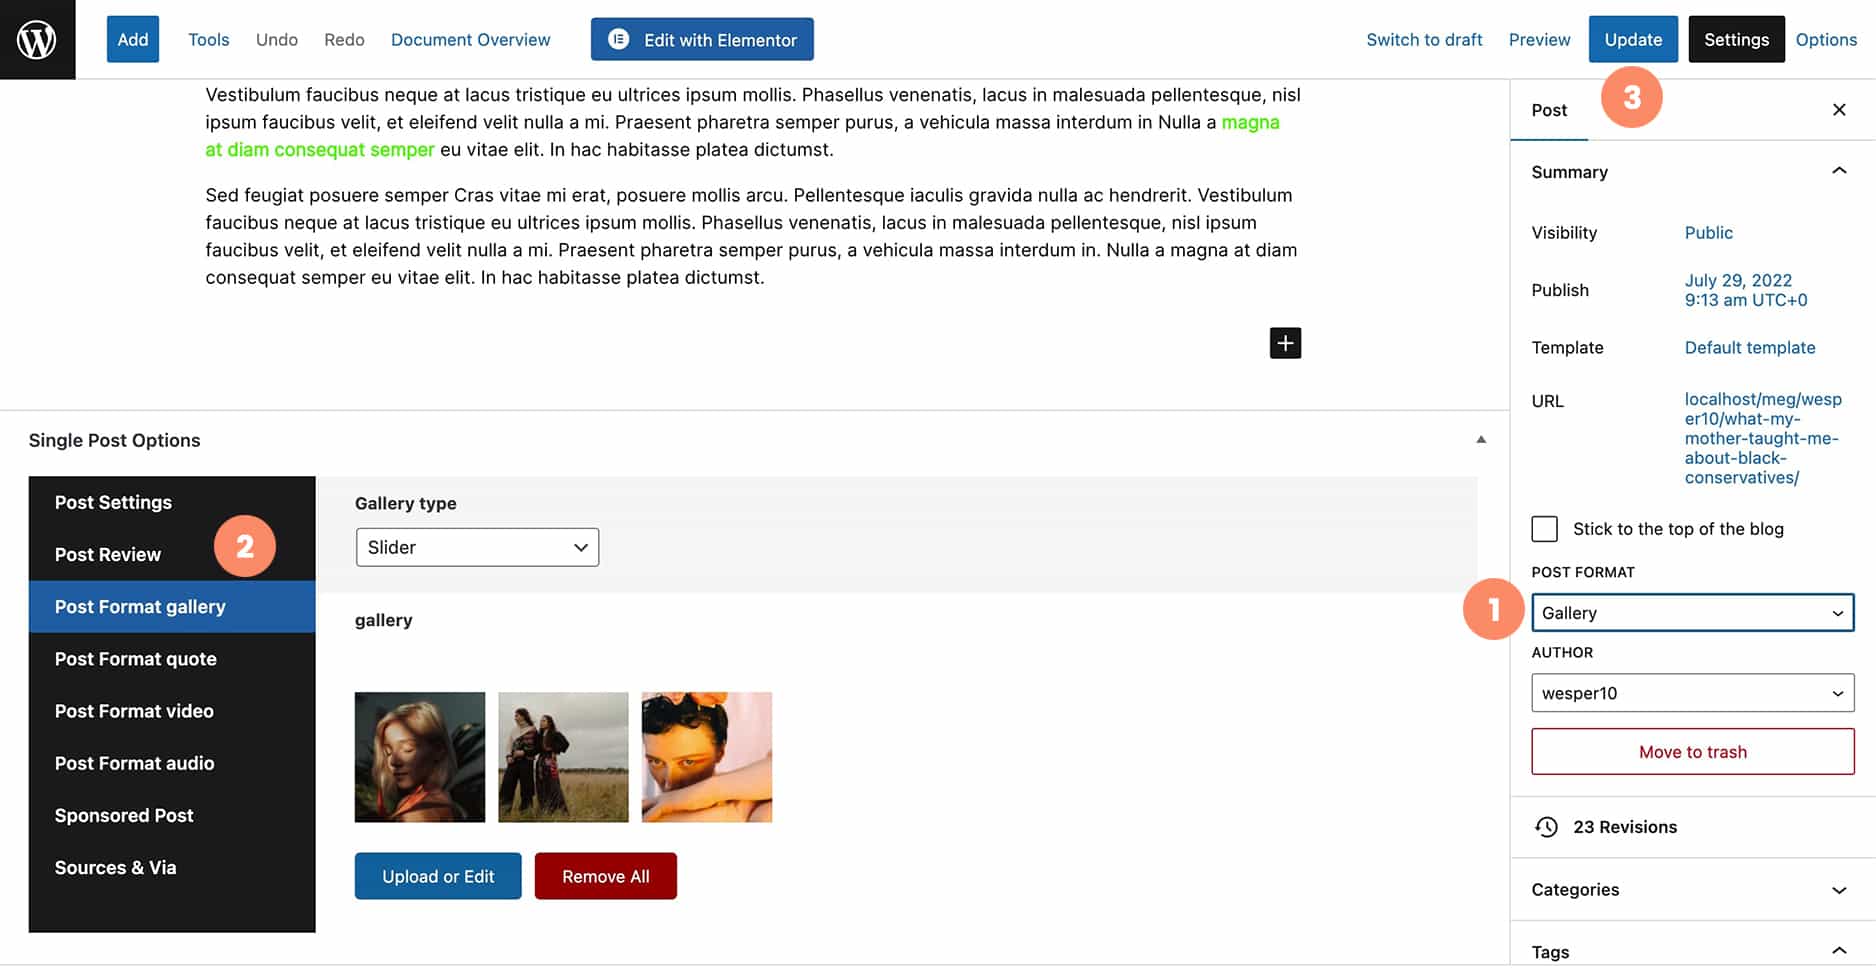
Setup post format
In this part, you can setup post format by edit or add post
- Choose post format (standard, gallery, quote, video, audio)
-
Click on post format you want (gallery, quote, video, audio)
Each section post format you can add content, image and options. - Click on update
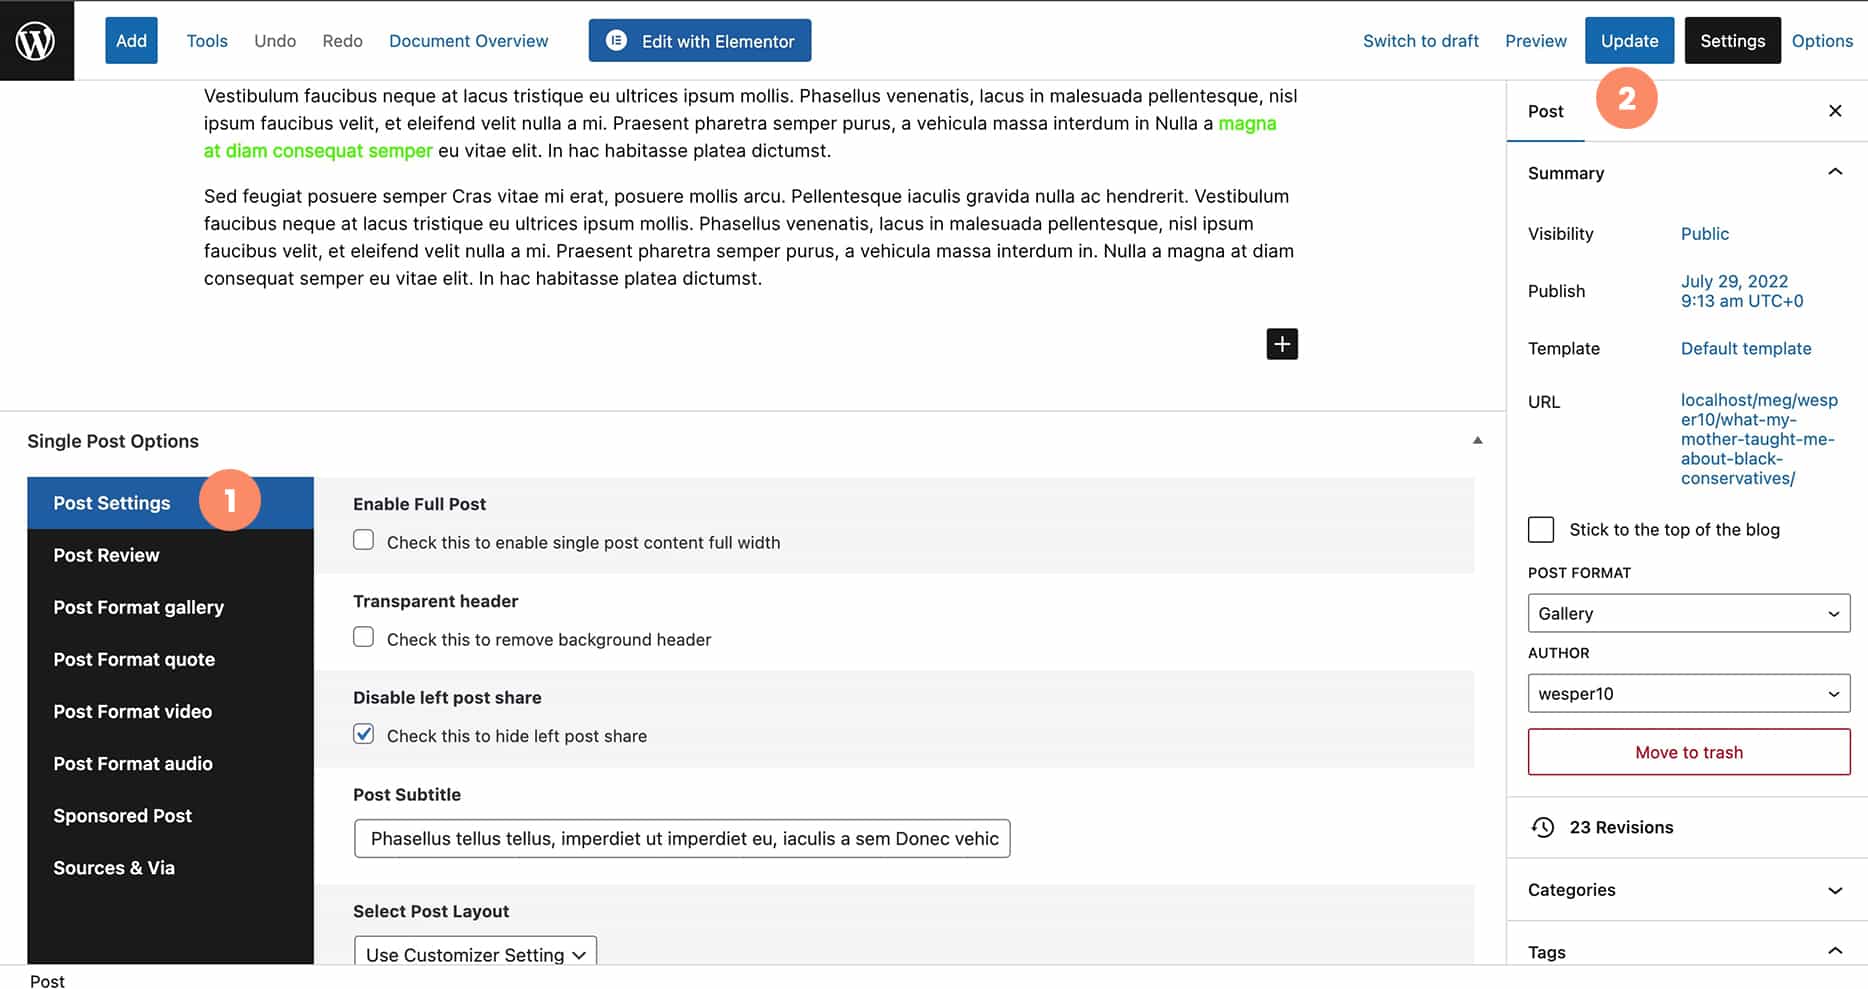
Setup post settings
In this part, you can setup post layout and settings by edit or add post
- Click on post settings
You can choose post layouts, set post full width and other settings - Click on update
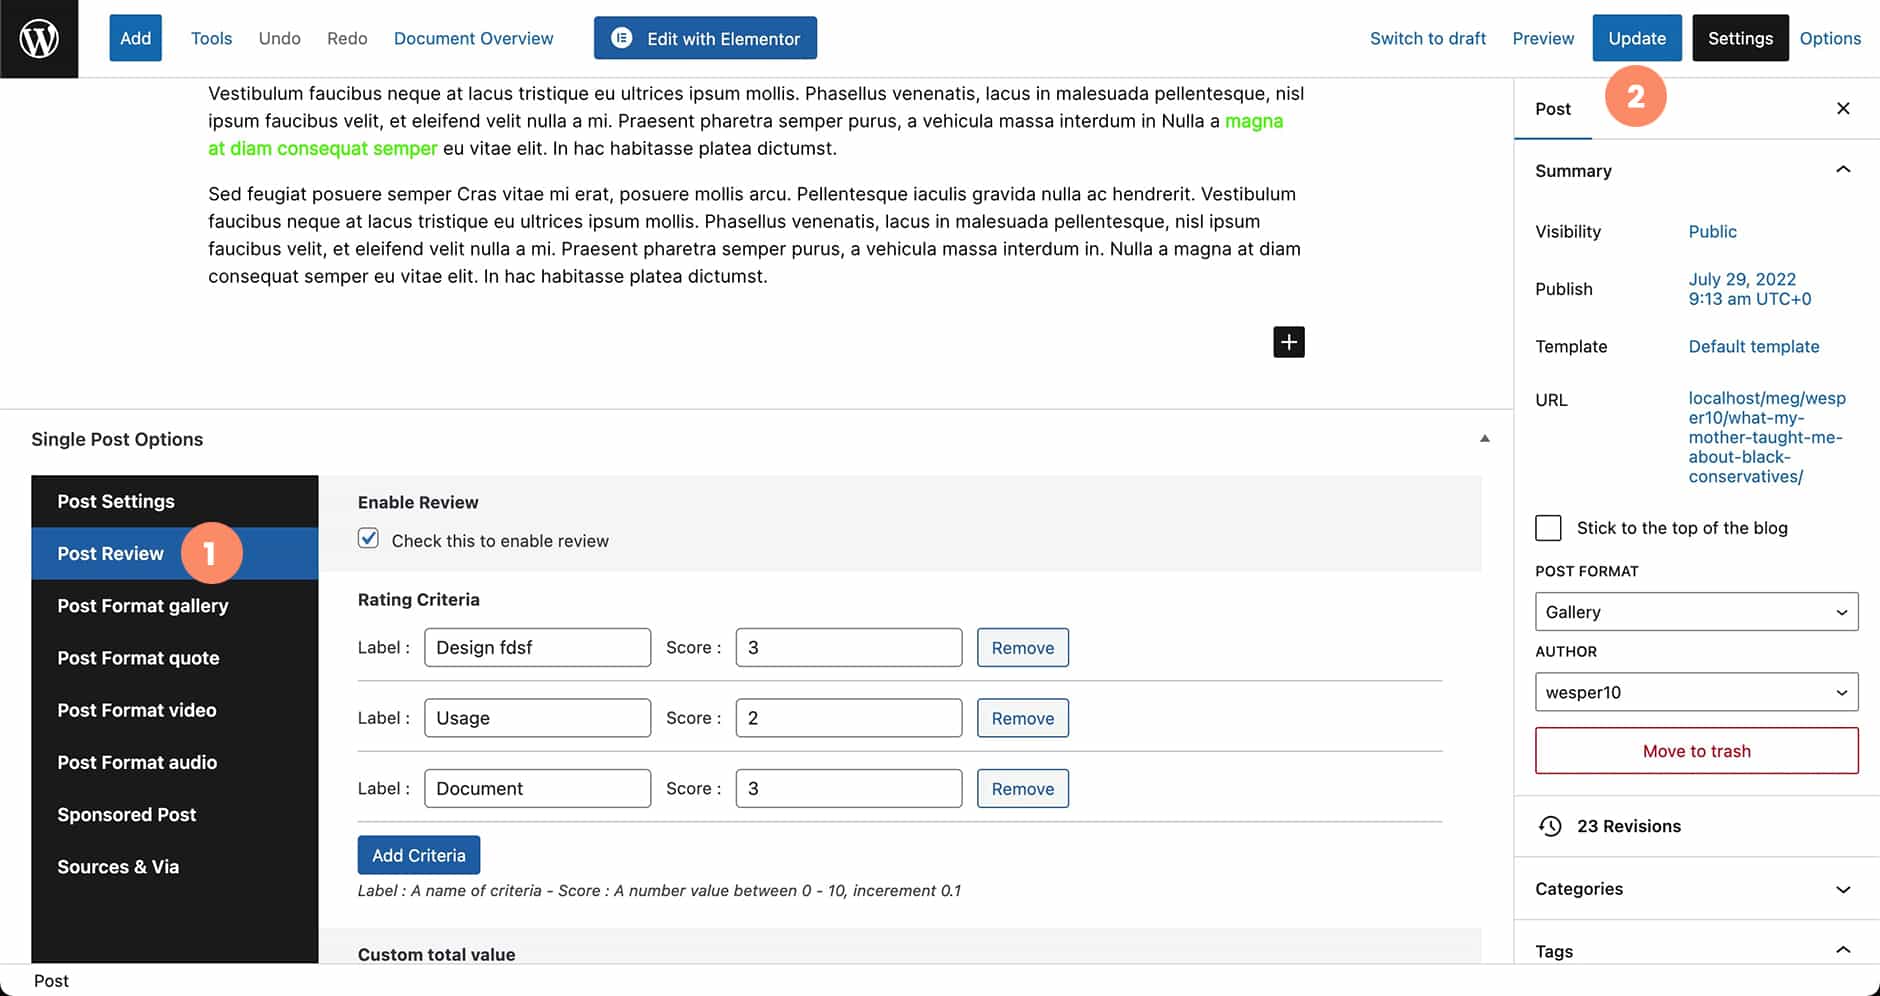
Setup post review
In this part, you can setup post review by edit or add post
- Click on post review
- Click on enable review
- Add review criteria
- Add review score - Click on update
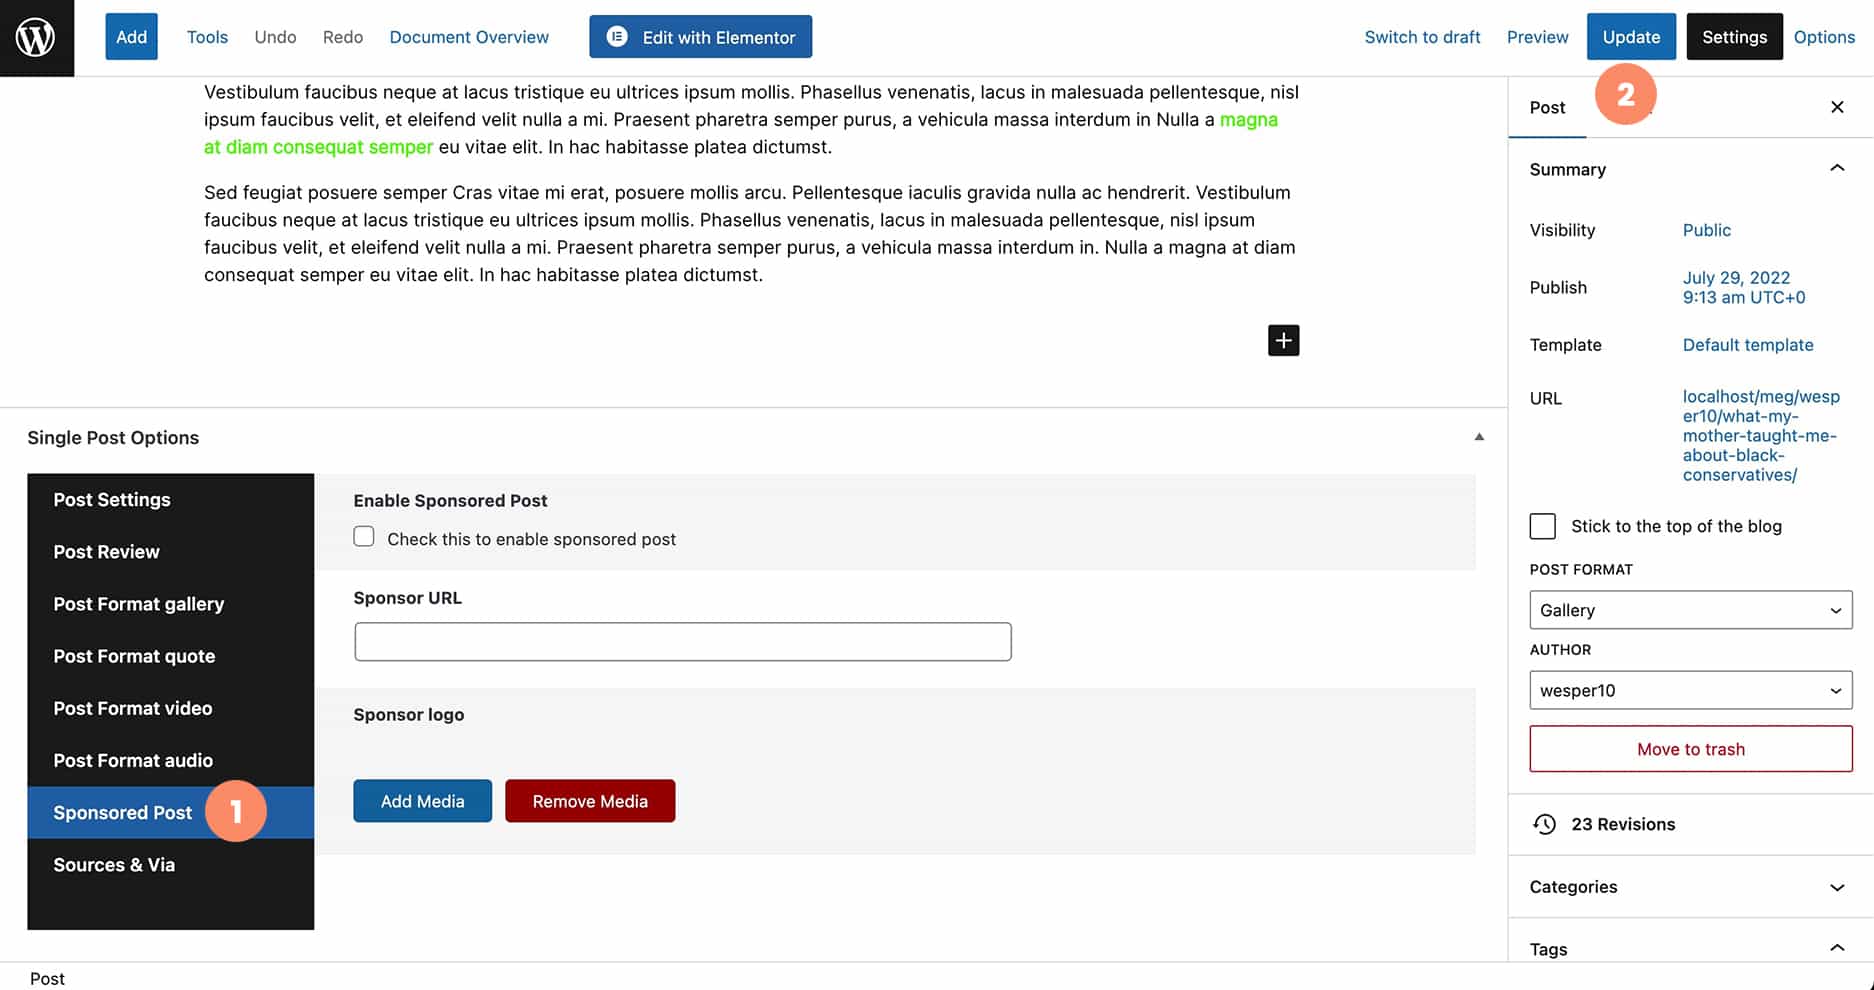
Setup post sponsored
In this part, you can setup post sponsored by edit or add post
- Click on post sponsored
- Click on update
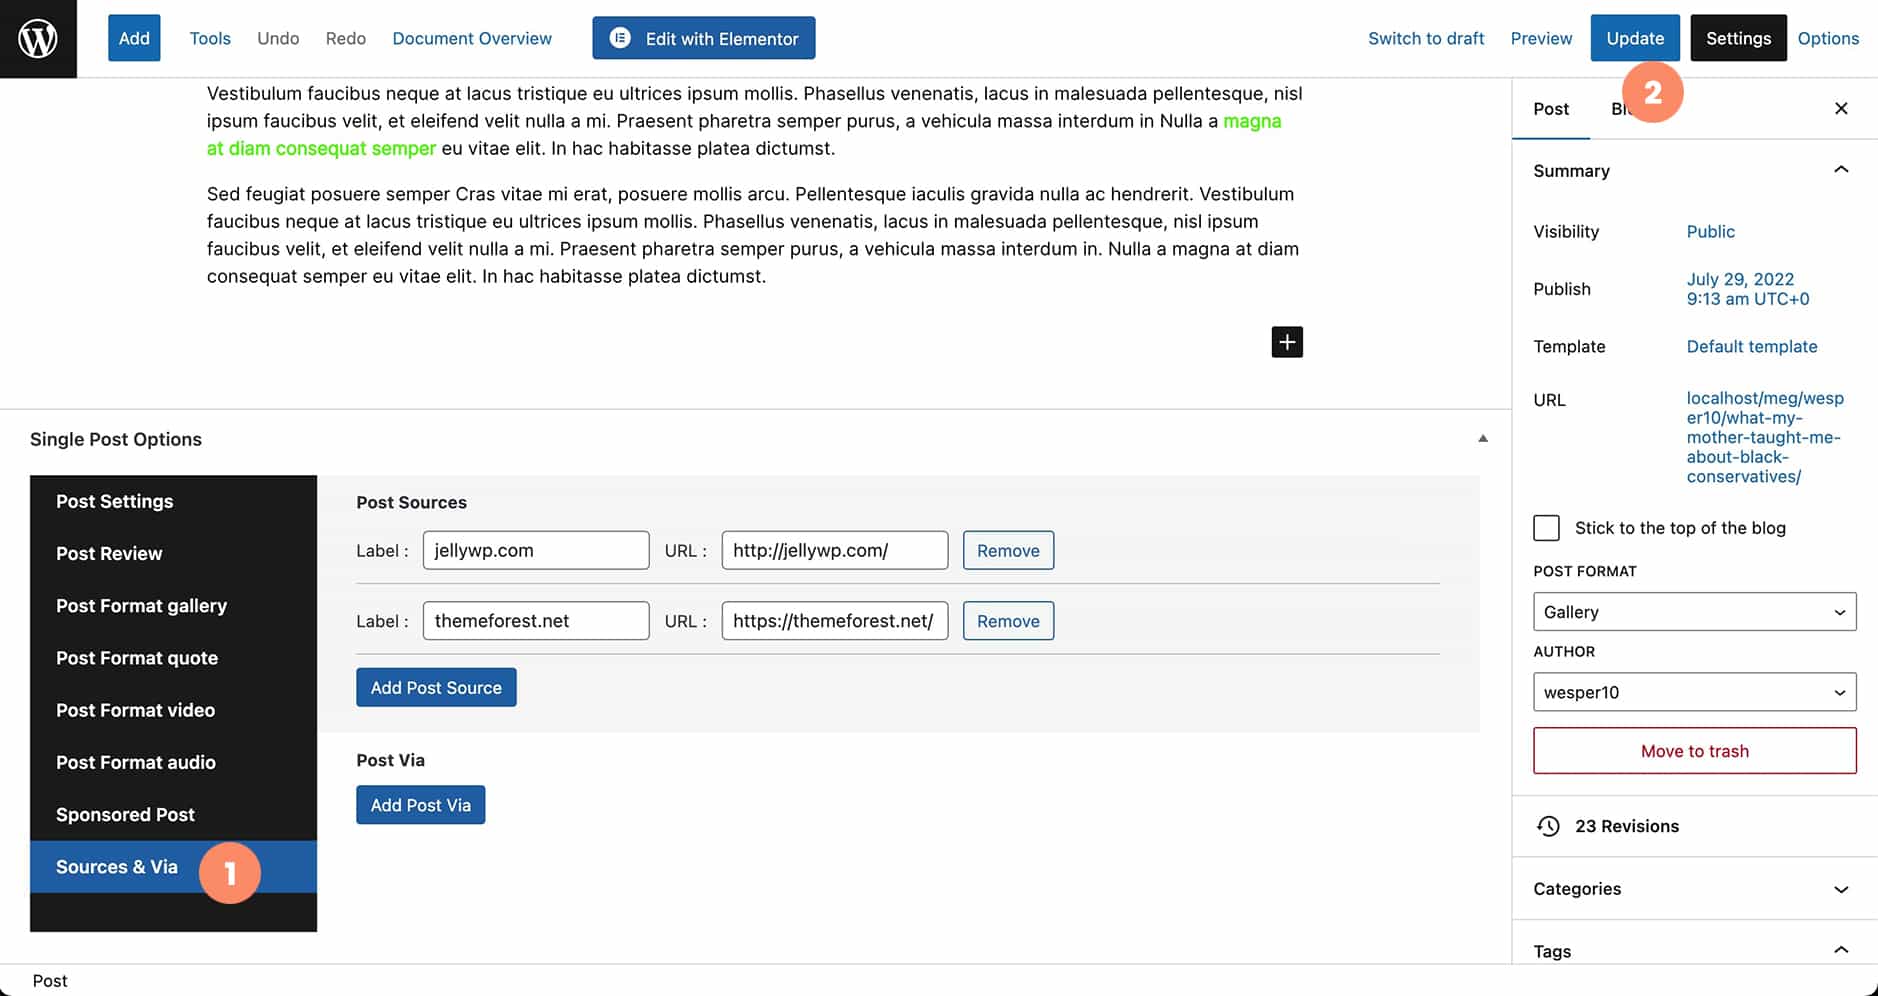
Setup post Sources & via
In this part, you can setup post Sources & via by edit or add post
- Click on Sources & via
- Click on update
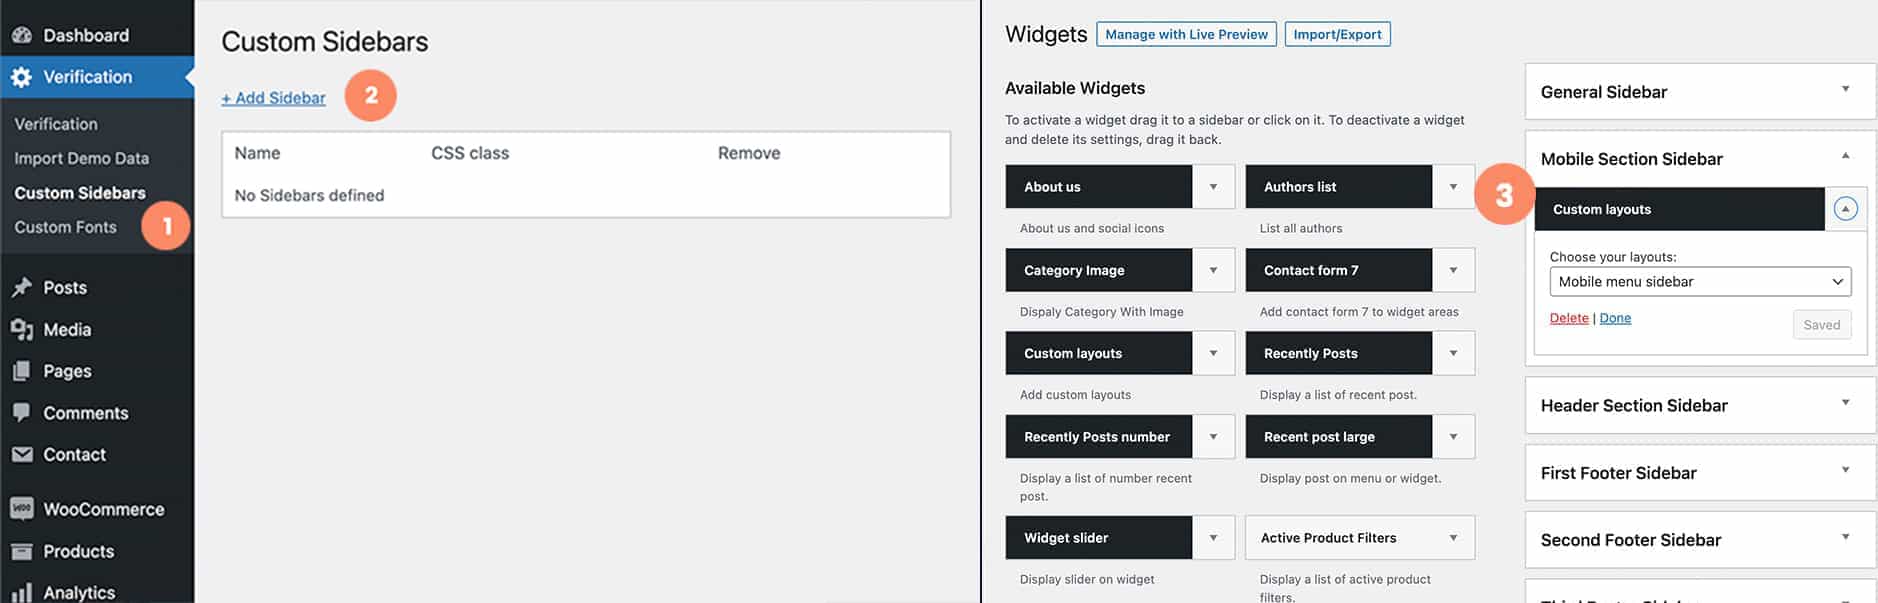
Custom sidebar
In this part, you can create sidebar for post or page by click on Verification
- Click on Verification → custom sidebars
- Click on Add Sidebar and for add new one
- After you add new sidebar you will see custom sidebar in Appearance → widgets
Custom header, footer, section
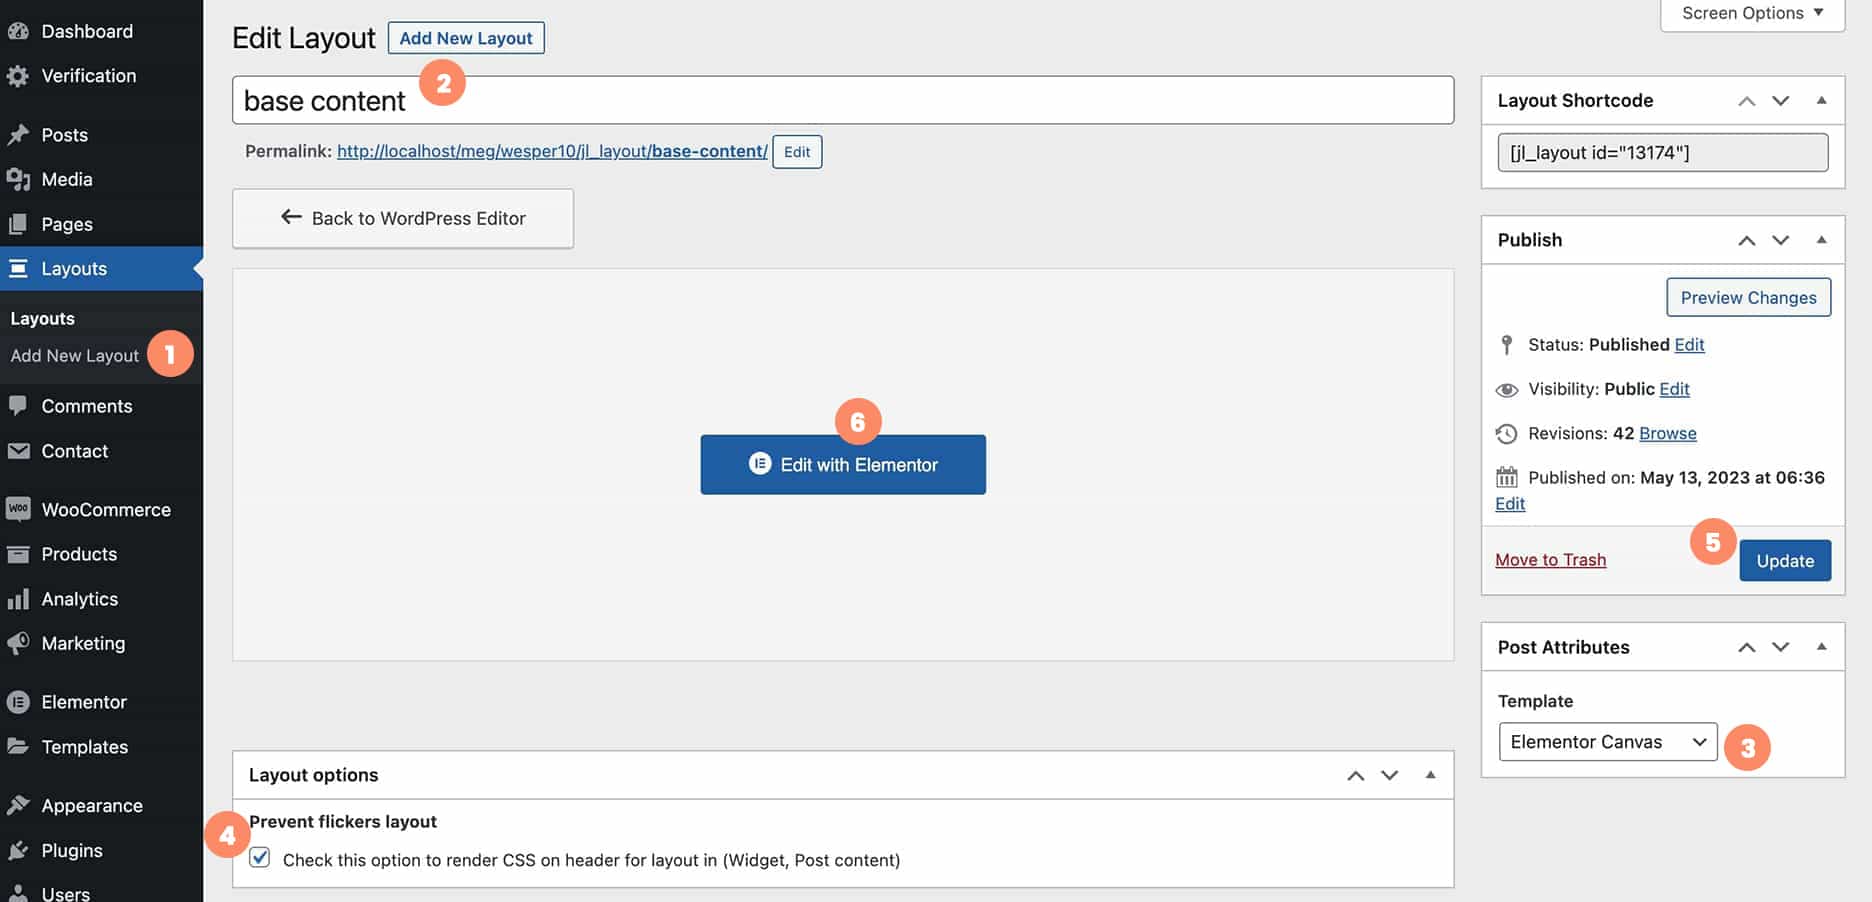
Create template
In this part, you can create template for header, footer, section
- Click on Layout → Add New Layout
- Add title for template
- Choose template
Elementor Canvas - If you use a custom template for header we recommend you enable
Check this option for load template style on header - Click on
Update or Publish - Click on
Edit with Elementorto custom header, footer, section with Elementor page builder
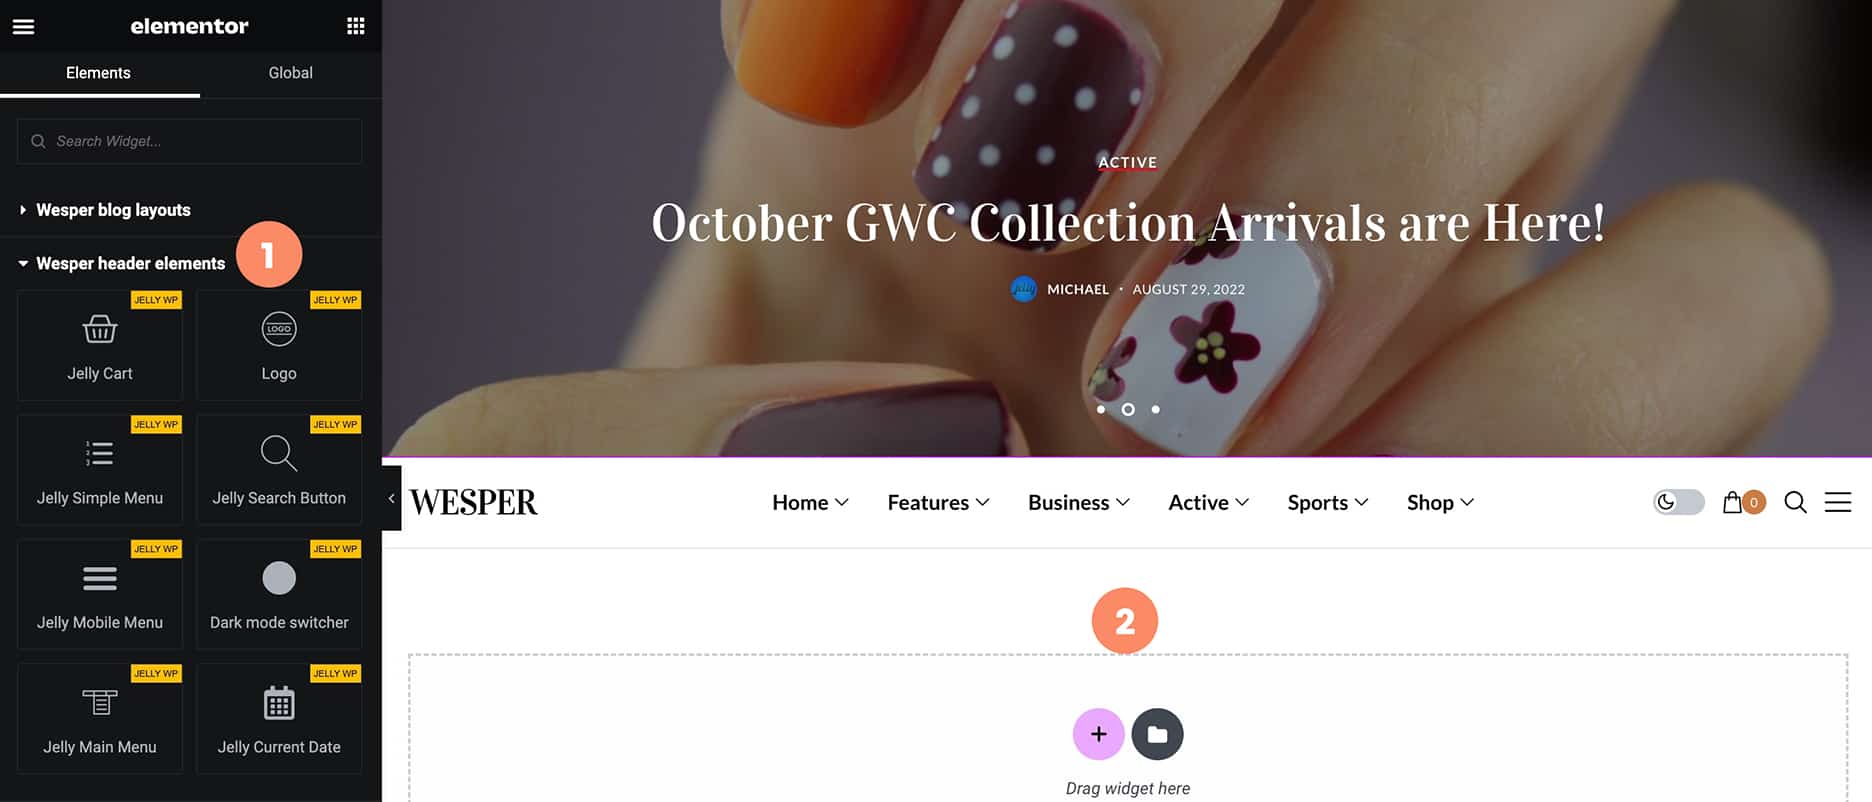
Customize template
In this part, you can create template with Elementor page builder
- Choose the element on the left side
- Add an element to the section and customize whatever you want
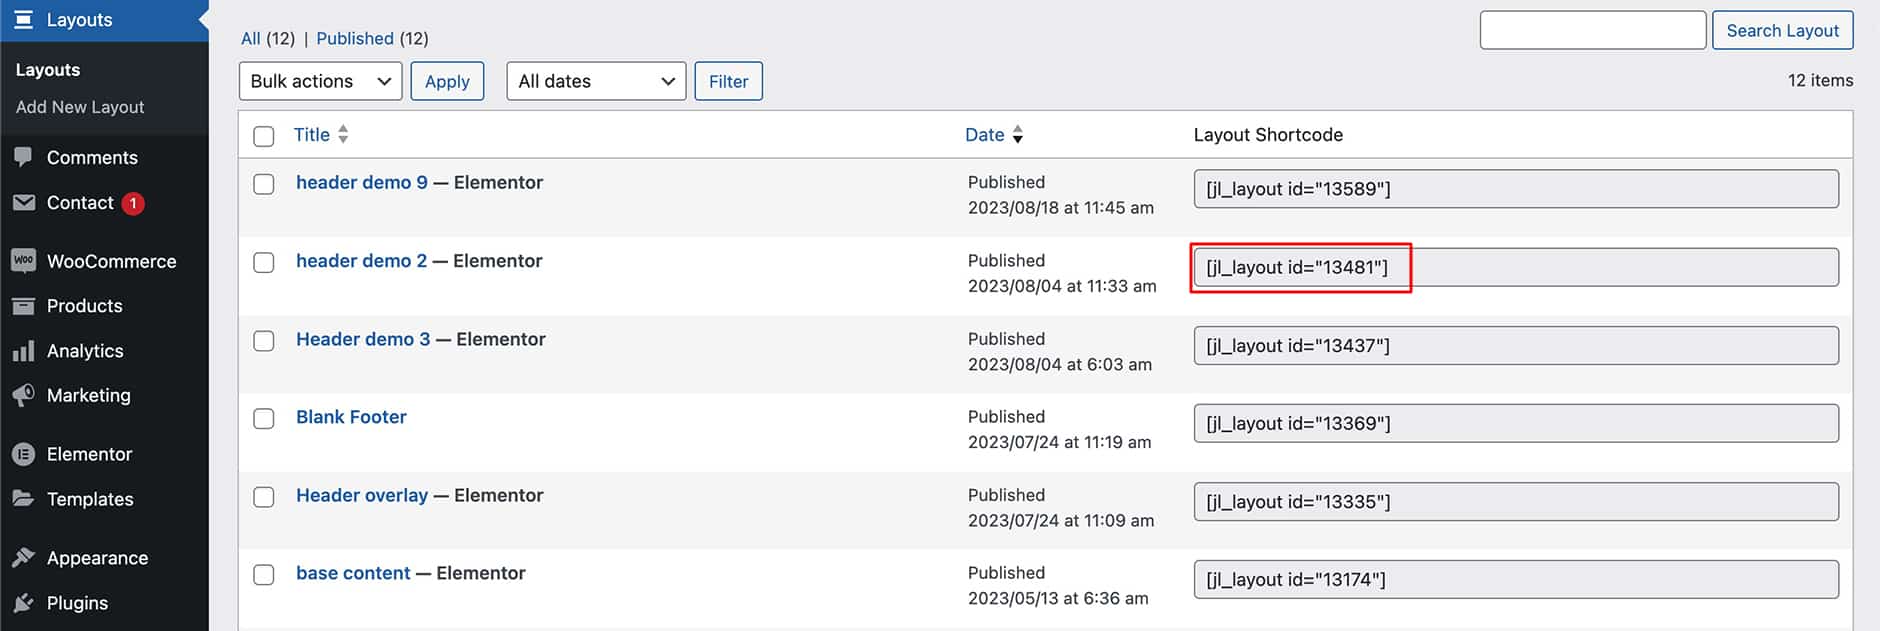
Copy WordPress shortcode
In this part, you can copy layout shortcode to (page, post, sidebar ....)
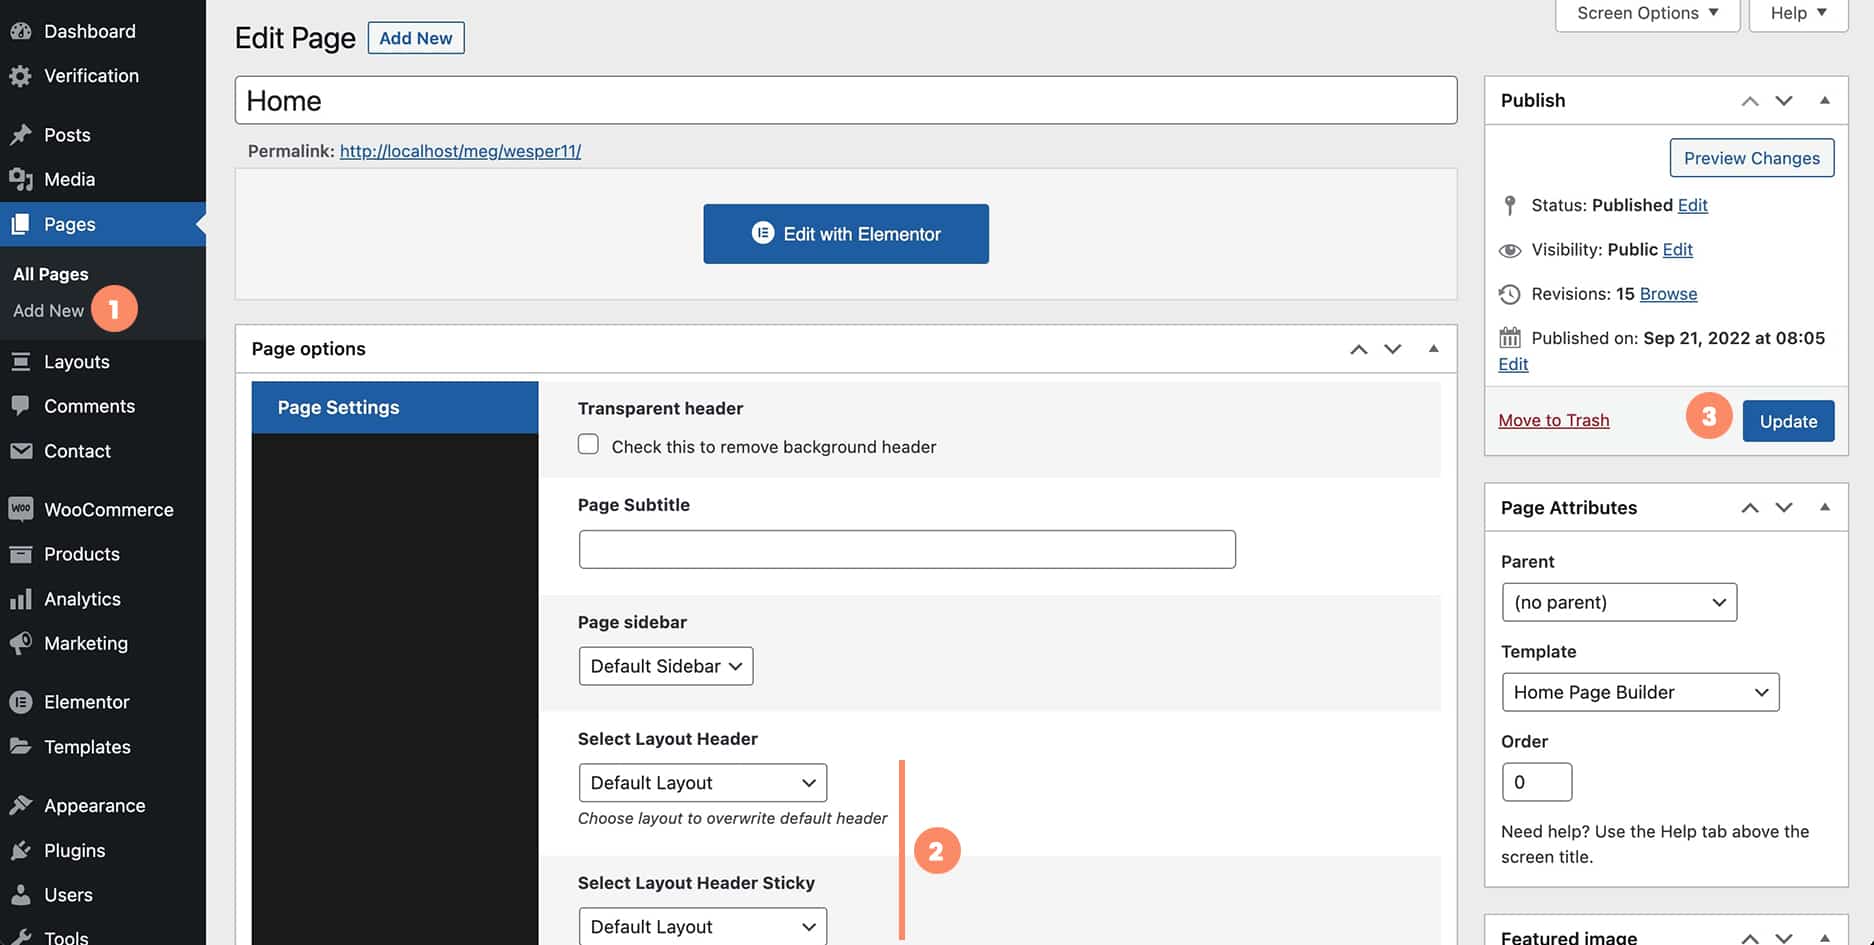
Apply custom header, custom sticky header, custom footer for specific page
In this part, you can apply template for your page
- Click on Add or Edit page
- Select header layout, sticky header layout, footer layout
- Click on
Update or Publish
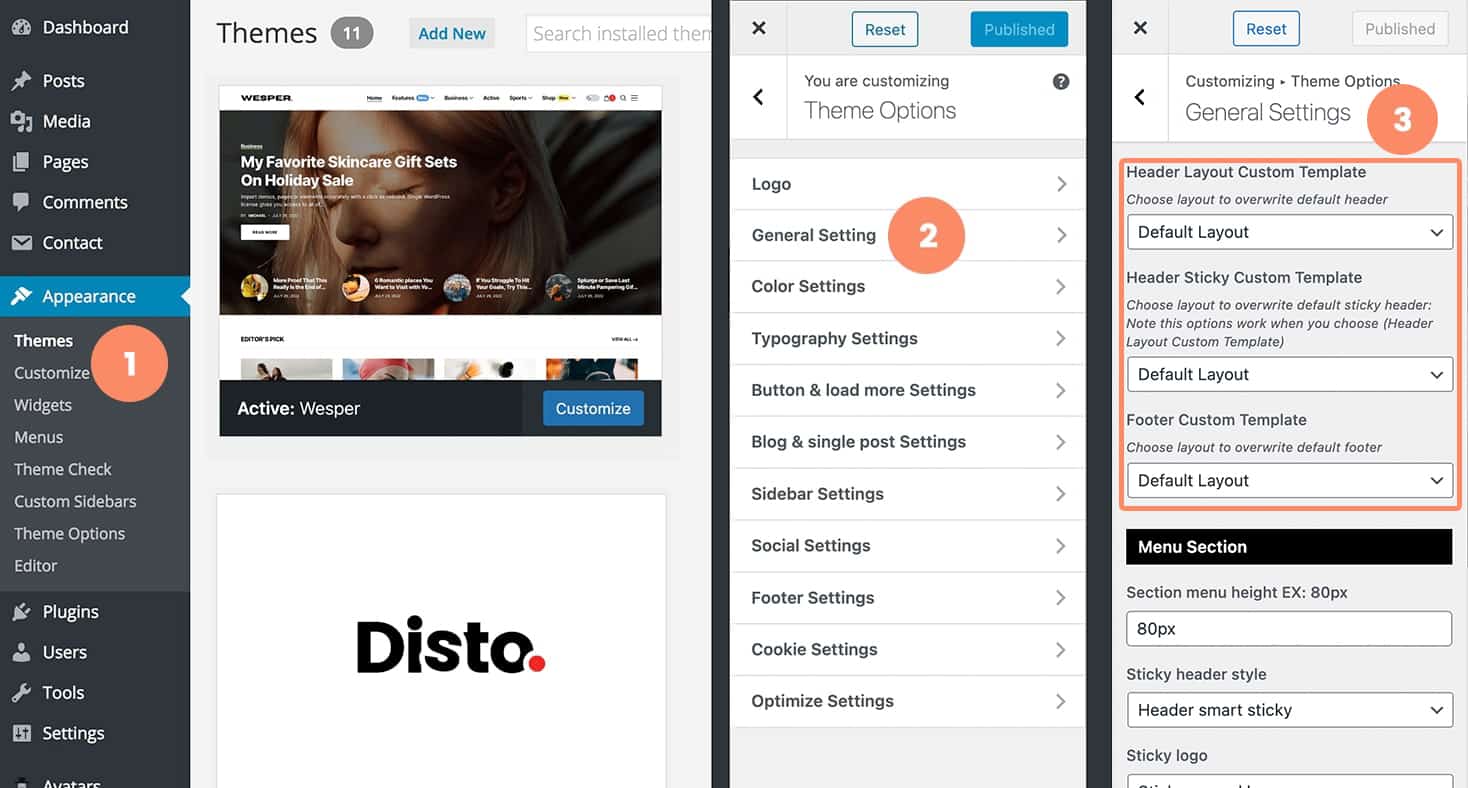
Apply global custom header, custom sticky header, custom footer
In this part, you can apply global template on your website
- Click on Appearance → customize
- Click on theme options → General Setting
- Choose custom template for (
Header Layout Custom Template,Header Sticky Custom Template,Footer Custom Template)
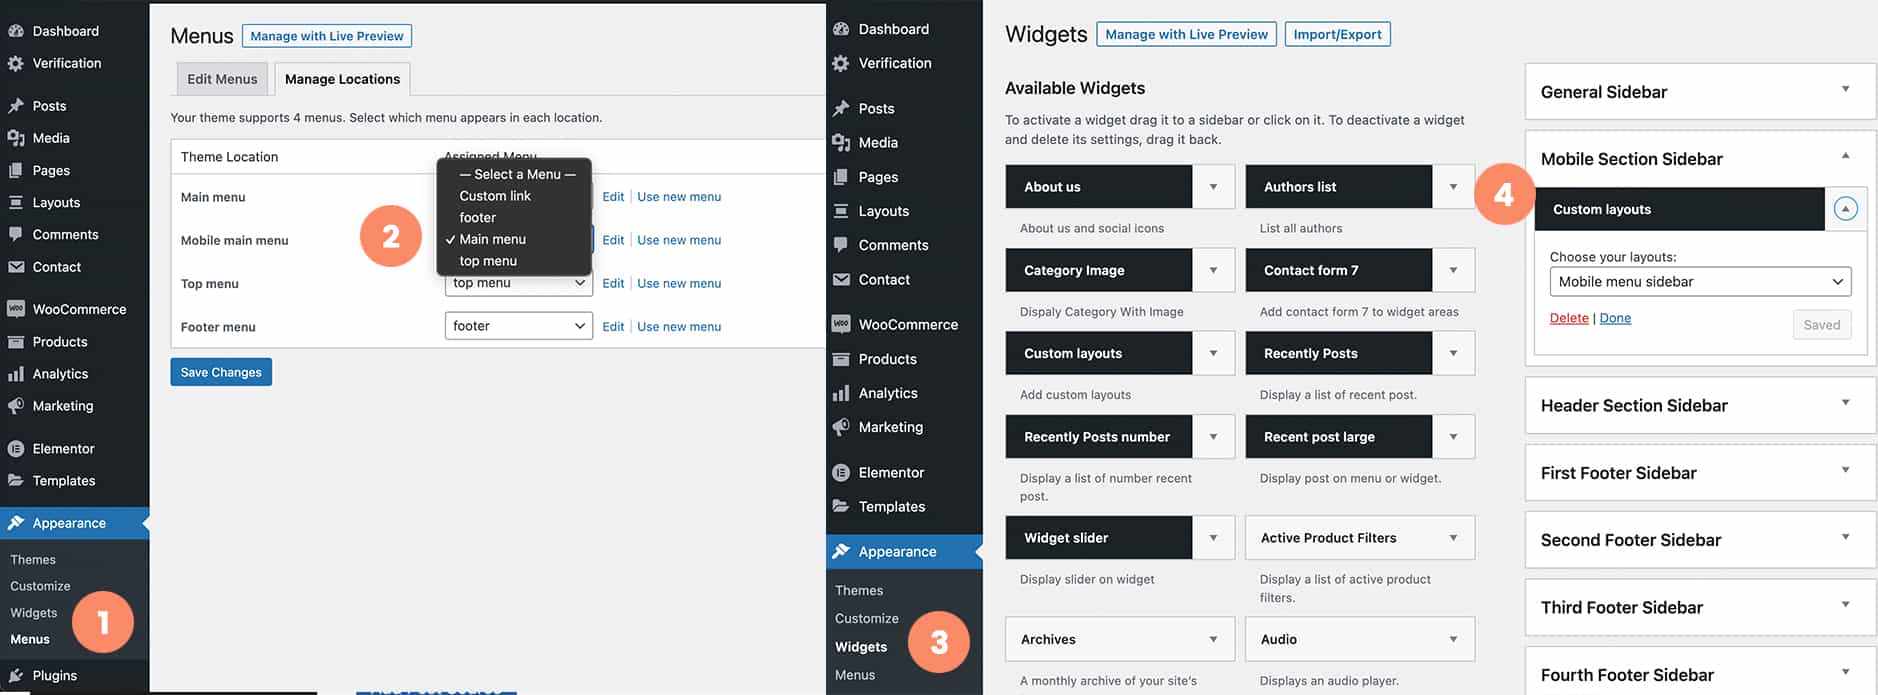
Mobile sidebar
In this part, you can manage menu and widget for mobile sidebar
- Click on appearance → menu
- Click on menu locations → and choose menu for mobile main menu
- To add widget to mobile sidebar, please click on appearance → widgets
- Add widgets to mobile section sidebar
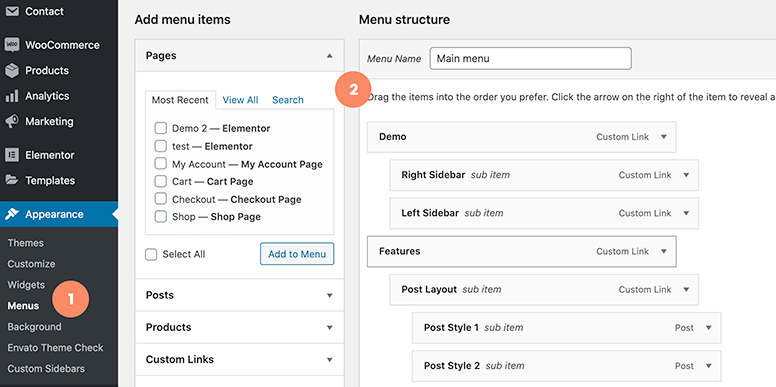
Setup menu
In this part, you can add menu to your website
- Click on Appearance → menu
- In menu area you can add page, post, category and custom link to menu
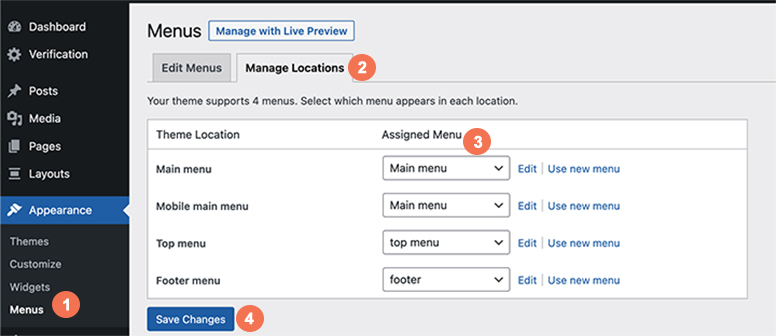
Choose menu location for your website
- Click on Appearance → menu
- Click on Manage Locations
- Choose your menu
- Click save change
Setup menu post
In this part, you can create mega menu that allow you to display post on menu with 3 different layout (Grid layout, Overlay layout, Small list layout)
- Click on Appearance → menu
- Click expend menu item to show setting
+ Check onUse menu category post
+ Choosepost layout,post columns,number post display

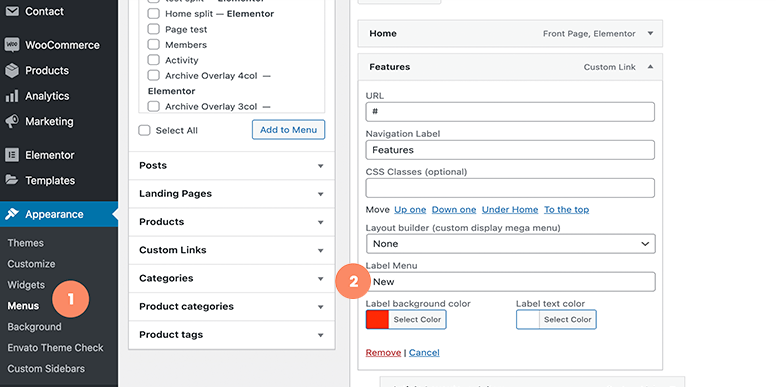
Setup menu label
In this part, you can create menu label, background color and color
- Click on Appearance → menu
- Click expend menu item to show setting
+ Addmenu labelbackground colorandcolor
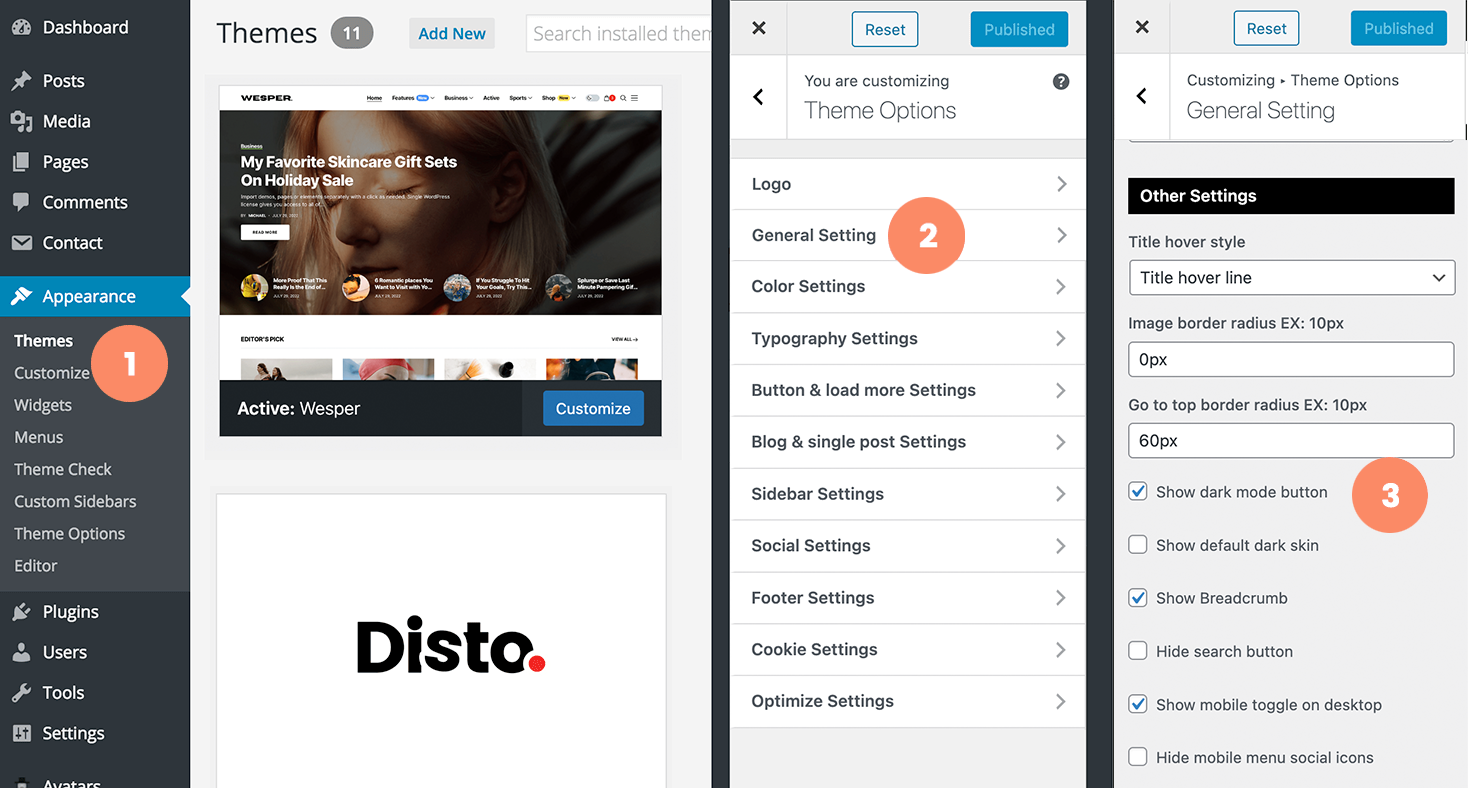
Night Mode
In this part, you can enable dark mode on header that allow visitors view your website with (dark mode and light mode)
- Click on Appearance → customize
- Click on theme options → General Setting
- Check on
Show dark mode button
Social Settings
In this part, you can add social link to your social profile
- Click on Appearance → Customize
- Click on Theme Options
- Click on Social Settings
- Fill social link you want
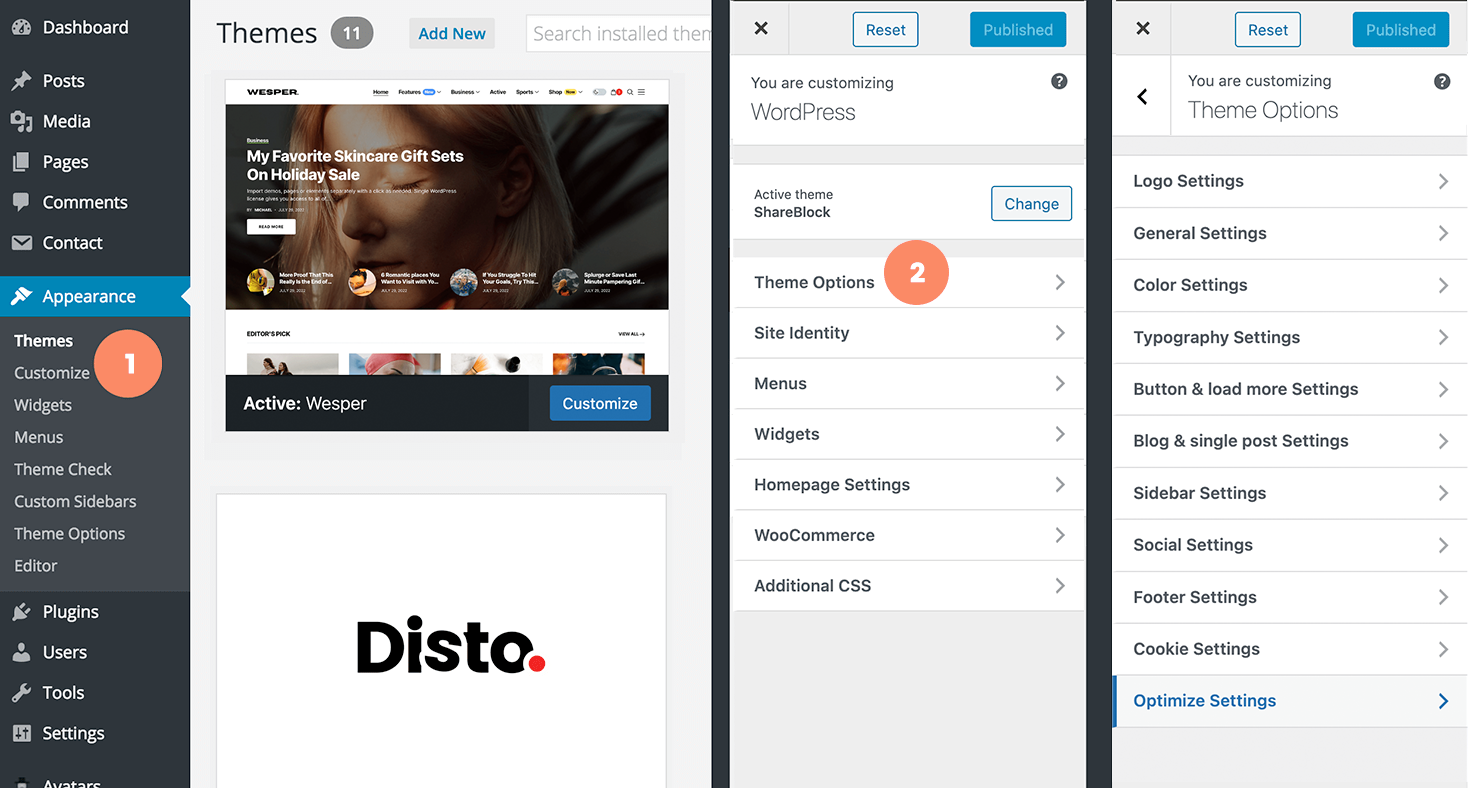
Theme Options
In this part, you can manage options and features of your website
- Click on Appearance → customize
- Click on
Theme Options
Logo SettingsIn this section, you can custom your logo image with dark and light modeGeneral SettingsIn this section, you can all default settingsColor SettingsIn this section, you can custom color, background on your websiteTypography Settingsyou can curom font size, font style, and font familyButton & Load More SettingsIn this section, you can custom appearance for button and load more buttonBlog & Single Post SettingsIn this section, you can choose post header style and manage show or hide feature in postSingle Post Progress SettingsIn this section, you can custom appearance progress bar on single postSidebar SettingsIn this section, you can choose sidebar for page, post, category, tag, search, author and archiveSocial SettingsIn this section, you can display your social media by add your social media linkFooter SettingsIn this section, you can choose footer settings, choose footer collumns and add copy right in your footerAdvertisement SettingsIn this section, you can add your Google adsense, ads image, or embed ads to your websiteCookie SettingsIn this section, you enable cookie notification on your websiteOptimize / SEO SettingsIn this section, you can manage SEO settings, Open Graph meta dataAMP SettingsIn this section, you can manage AMP appearance and settingsTheme StringsIn this section, you can translate your theme strings without using any plugin